
Draw walls
- 1Pick Draw walls (W).
- 2Click to place each point. For an exact wall, type its length in metres (e.g. 3.45) and press Enter.
- 3Click the first point to close the outline, or press Enter / double-click to finish. Esc cancels.
Turn on Snap to walls in the toolbar so points snap to the grid and existing wall ends, keeping corners closed.
Draw a rectangular room
Pick Draw rectangular room (R) and drag: Roomcraft creates four walls and the room floor at once. Then select each wall to set its length, thickness and height in Properties.
Select the room floor to rename the room, change the flooring, turn on the Ceiling, and see its area and perimeter.
Doors and windows
- 1Pick Door (D) or Window (N).
- 2Click a wall to place it.
- 3In Properties, set the width, height, sill height (windows), position along the wall and curtains on or off.
Measure and dimension
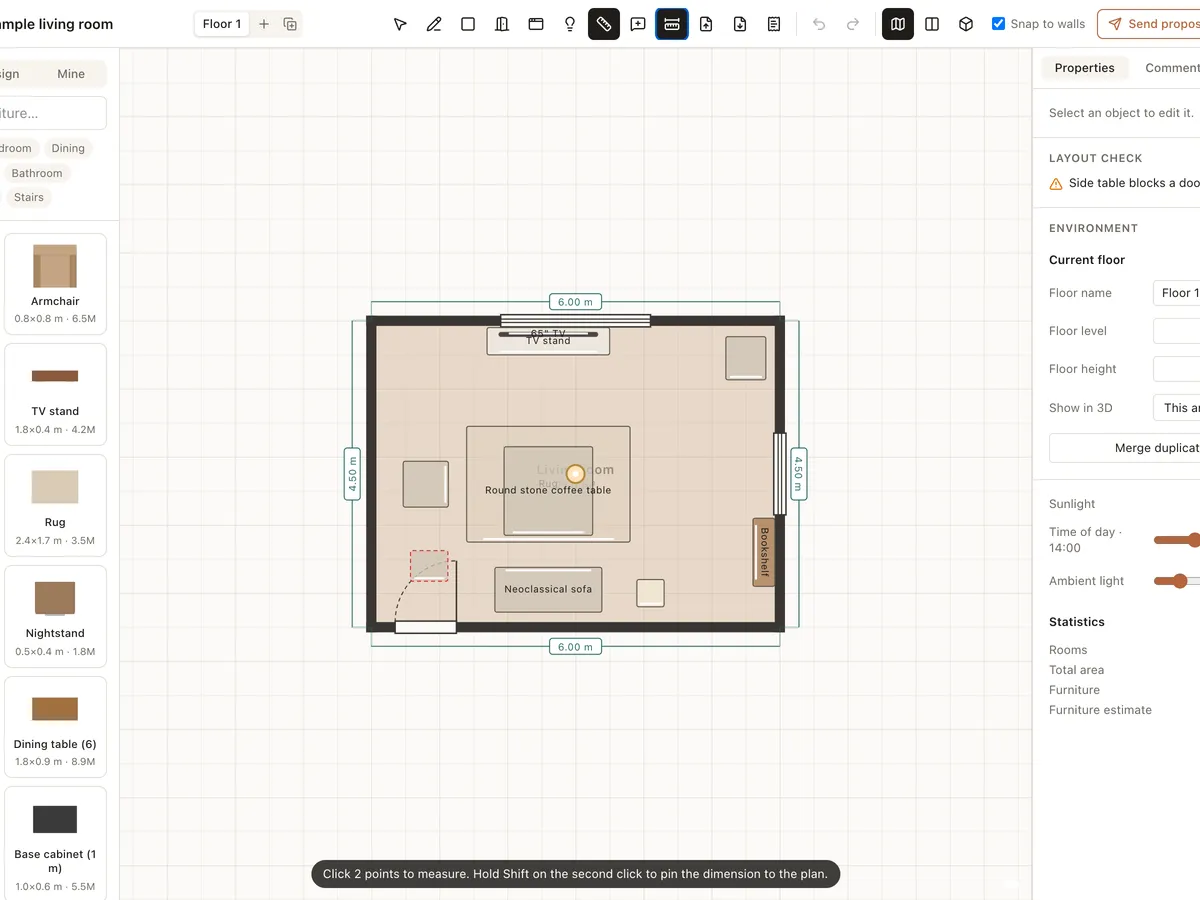
The Measure tool (M): click two points to measure the distance. Hold Shift on the second click to pin the dimension to the plan; pinned dimensions also appear in exported PDFs.
The Show wall dimensions button in the toolbar labels the length of every wall on the plan.
Auto dimensions (next to it) draws dimension chains outside the building — wall corners and door/window edges, then the overall size, outer face to outer face — and the clear width and depth inside each rectangular room. Tick Auto dimension chains in the export dialog to print them.
Floors and stairs
The floor picker at the left of the toolbar switches floors, adds an empty floor, or adds a floor copying this floor's walls (handy for townhouses with similar floors).
In the Environment panel, set the floor name, level, floor height, and whether 3D shows only this floor, this floor and those below, or all floors.
Stairs are in the Stairs category of the library. Select a room and use Cut a stairwell in the floor above to open the floor, or Open to below (no floor) to drop the room's floor.
After importing or tracing, use Merge duplicate walls to clean up walls drawn twice.
Wall tools, structure and ceilings
Select a wall to open Wall tools: drag the diamond in the middle of the wall (or set Curve) to bend it into an arc — the floor follows the curve; Split cuts the wall at a distance from its start; Parallel wall adds a copy 1 m (or any distance) to either side. Walls with doors or windows stay straight.
Select two straight walls in line with Shift + click and press Join walls to make them one again.
View elevation shows the wall face-on with its doors, windows and the furniture against it, dimensioned in millimetres. Flip the side, then download SVG or PDF. In the PDF export, Add elevations of walls with kitchen cabinets adds one sheet per kitchen wall.
Columns, beams and service shafts are in the Structure category of the library. Columns and shafts run floor to ceiling, beams hang under the ceiling; they are not priced in the quote.
Select a room and tick Ceiling to set its Ceiling height and a Stepped ceiling: a band of the chosen width that hangs below the ceiling around the room.
Layout check
The Layout check panel on the right lists problems as you work: furniture that overlaps, runs into a wall, blocks a door swing, or leaves too narrow a passage. Click a line to select the piece involved.
It also checks the architecture and how rooms are used: a wall left open at one end, a closed room with no door, two doors swinging into each other, a stair with no stairwell above, and pieces without room to use them — 90 cm in front of kitchen units and the fridge, 70 cm in front of a wardrobe or vanity, 60 cm beside a bed and in front of a toilet, 75 cm around a dining table. Clicking a line also centres the plan on it.
Room data and area schedule
Each room shows its name and area on the plan; select it (or turn on Auto dimensions) to see its perimeter and ceiling height too.
Area schedule in the Environment panel lists every room floor by floor, with floor totals and a CSV download for spreadsheets.
Auto-furnish a room
- 1Select a rectangular room. Under Auto-furnish, check the Room type (guessed from the room's name).
- 2Leave Replace the furniture already in this room ticked to start fresh, or untick it to add around what is there.
- 3Click Furnish this room. Roomcraft tries the set against every wall, keeps clear of doors and windows, and keeps the placement with the fewest layout problems. The new pieces are grouped, so you can drag them together, and one Ctrl + Z undoes it all.